Roofing installation is one of the toughest home renovation projects. It requires specialized skills and tools to complete properly, and mistakes can result in serious damage to your house.
Before the roofers begin, they’ll prepare your property by covering plants and cars, setting up ladders and scaffolding, and putting down tarps. This will keep debris from scrubbing your landscaping. View Our Site for more details.
The roof is the outer layer of your home that protects it from scorching sun, torrential rain, melting snow, and strong winds. It is comprised of many components that work together to shield your furniture, belongings, and the internal structure of your home from water infiltration and damage.
To understand how a roof works, it is helpful to consider the different layers of the roofing system. The frame of a roof is referred to as the sheathing and it can be made from plywood or oriented strand board (OSB). In older homes, the sheathing may be tongue-and-groove 2x10s, while prefabricated trusses are typically used on newer construction.
On top of the sheathing is an underlayment that helps seal the roof against moisture. Next, a new drip edge is applied along the perimeter of the roof to prevent water and debris from blowing underneath shingles. Finally, flashing is laid around any areas where the roof changes direction such as chimneys and vents.
Before a contractor starts working on your roof, they will clear and cover any plants or other movable objects near the house. This step is crucial as hammering vibrations could damage these items and knock them loose. It is also wise to move vehicles and put away any toys, tools, or lawn equipment that might get in the way of the crew as they work.
Once the yard is cleared, the roofing crew will begin by laying tarps or wooden boards to keep any debris from falling on your property. They will also set up a dumpster in your driveway, sweep the debris from the roof, and install their safety harnesses.
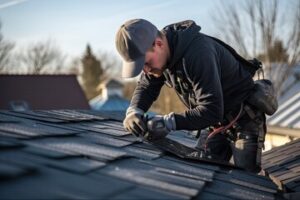
After that, the roofers will remove the old shingles or tiles and begin the tear-off process. They will start from the eaves and work their way up towards the peak. As they go, they will inspect the sheathing and underlayment to ensure it is in good condition. They will also check the flashing and drip edges for any signs of moisture or leaks. If necessary, they will replace the sheathing or underlayment.
Materials
A residential roof endures a lot of stress from freezing winter temperatures, blistering UV rays, and wind-driven rain. Over time, it will deteriorate and require new roofing materials to keep water and other elements out of the home. Installing a new roof can improve your property’s curb appeal as well.
Before beginning a roof installation project, your contractor will need the proper tools and materials to complete the work safely and efficiently. These include:
The underlayment is the material that goes down over your decking and joists before installing shingles. The type of underlayment your roofing contractor uses will depend on the type of roof you have. For example, if you have a flat or low-sloped roof, your contractor will use a breathable underlayment like tar paper or felt. If you have a sloped or pitched roof, your contractor will use a waterproof underlayment like rubberized bitumen.
You’ll also need a pry bar to remove nails, staples, and other fasteners that hold down existing roofing materials during the tear-off process. This tool is especially helpful on sloped roofs because it allows you to work more easily and avoid injury by falling debris. Finally, you’ll need a hard hat and protective eyewear to shield yourself from falling objects and dirt.
Many roofs are vulnerable to leaks, especially around the eaves, valleys, and penetrations. To prevent these leaks, your roofing contractors will use a product such as GAF WeatherWatch mineral-surfaced leak barrier, which gets installed in and around the most vulnerable areas of your roof.
In addition to leak barriers, your roofing contractors will need a variety of other supplies, including pipe vent flashing, fascia boards, and roofing shingles. These materials seal the holes cut into your roof for ventilation pipes, skylights, and other penetrations. You can choose from a variety of colors and styles of shingle, but it is important to find a material that will last and resist damage from the sun’s rays and extreme temperature changes.
Modern energy-efficient roofs help reduce your home’s carbon footprint by reflecting sunlight instead of absorbing it. This means your HVAC system won’t have to work as hard to keep your home comfortable year-round.
Installation
Your roof is the most important part of your home. It’s your house’s first line of defense against blazing sun, pounding rains and gusty winds, plus snow and ice. It protects your belongings and encloses your living space, adding to the beauty and value of your property.
To do its job, your roof must be able to withstand decades of wear and tear. It’s not uncommon for a roof to need replacing after 10 to 15 years. To get the most out of your roof, you’ll need a professional roofing contractor with an extensive list of credentials and plenty of experience.
Before starting the installation, make sure your contractor has the right equipment on hand. Check that your contractor has the proper insurance and bonding, as well as a valid license. They should be able to provide you with copies of both before the project starts.
On the day the work begins, you will need to move your vehicles and any other movable items away from the house. This will keep them from being covered in shingle debris and smashed by falling ladders or tools. You should also cover any plants or other outdoor fixtures with tarps to prevent damage from falling shingle scraps and nails.
The roofer will begin by removing the existing roof covering. Depending on the material, this could take a few hours or several days. Then, they’ll install the underlayment. They’ll start at the bottom side of the gable and overlap each section as they progress up to the peak. After that, the ice and water barrier is laid and the drip edge is fastened down.
They’ll then start installing shingles, beginning with the lower slope. If they’re going to be putting in a new roof window, they’ll need to cut through the sheathing and frame an opening before adding a skylight or other fixture.
Before installing the ridge cap, the roofer will need to cut a series of tabs from the existing shingles and fold them over the top of the ridge. They’ll then nail the tabs to the ridge flashing and sheathing, securing them with roofing nails that are longer than those used in the rest of the roof.
Checklist
There are a few things homeowners and business owners should do to prepare for roof installation. First, they should make sure everyone is aware of the work to be done and is aware that there will be noise and dust. Also, it’s a good idea to make arrangements with neighbors if you live in an apartment building or condo complex so they know that people will be coming and going from the property throughout the duration of the job. This is especially important if they have children or pets who may be disturbed by the process.
Next, if you have any additions to your rooftop, such as solar panels or satellite dishes, they need to be removed before the roof is replaced. The vibrations caused during a roof replacement can cause them to shake loose. Inspect the attic space to ensure that everything is secure, and cover or remove anything valuable that’s stored there, such as china cabinets and artwork. It’s also a good idea to take down any outdoor decorations, such as flags or wind chimes, and move any garden ornaments, statuary or other items that are near the roof’s perimeter. This will help keep them safe from debris and falling shingles.
The roofing contractor will examine the existing roof for areas that need attention. This will include the flashing around chimneys, vents and skylights for signs of deterioration and gaps. They will also examine the shingles and gutters to see if they are damaged or in need of repair. They will also look at the soffits and fascia boards to ensure they are in good condition and securely attached.
During the inspection, the roofing contractor will also go inside the attic to see if it has proper insulation. This is a critical step, as if the attic doesn’t have enough insulation, it can cause the rafters to sag and lead to leaks in the house. They will check for signs of moisture on the attic floor and also examine the trusses and roof vents for damage or wear.
Finally, the roofing contractor will look at the ridge and hip lines of the roof to see if they are in need of repair or are missing any shingles. They will also examine the shingle vents, which should be properly installed and sealed, and they’ll inspect the pipe boot, which is where the vent stacks emerge from the roof. This should be sealed correctly with ice and water guards, or else it will allow moisture to penetrate the shingles.